Game AI Simulator: Level Editor
- Tyler Fronczak

- Jan 7, 2018
- 5 min read
Updated: May 16, 2018

So it begins...
Welcome, to the first post devoted to tracking the development progress of Game AI Simulator. This post will cover the creation of an in-app level editor that allows for real-time edits to the 3D environment.
Mesh Primer
In the case that you are already familiar with the concept of polygonal meshes, feel free to skip to the next section. Otherwise, here are some important concepts that will make this post more insightful:
Polygon Mesh- In terms of computer graphics, a mesh refers to the shape of an object, which is comprised of vertices, edges, and faces. In order to render a mesh in Unity, the Mesh class should be supplied with collections of vertices and triangle indices, as well as colors, UVs, and/or surface normals, depending on how the shape should be displayed.
Triangle Indices- This is a collection of integers, that determines the vertices that each triangle uses. As an example, suppose you wanted to create a triangle that blocked half your computer screen with vertices at the bottom-left, top-left, and bottom-right, which are indexed at 0, 1, and 2, respectively. You would need to create a collection of three integers that refers to the index of each vertex, which could be any of the following: [0,1,2] [0,2,1] [1,0,2] [1,2,0] [2,0,1] [2,1,0]. Which collection would you use? Well, it is important to know that Unity only renders one side of a triangle and it is based in a clockwise manner. If you had chosen something like [0,2,1], you would only be able to see the triangle if you were looking at the back of your screen because from that perspective the order of the vertices was clockwise. Assuming you wanted to see the triangle from the front of the screen, you could instead use [0,1,2].
UVs- A collection of coordinates ranging from 0 to 1 that determine what part of a texture should be displayed between specific vertices.
Surface Normals- In Unity, a normal is a vector that is perpendicular to the surface of a plane. It is important to calculate the normals of a mesh because they influence how light interacts with the surface of an object.
Discrete vs. Contiguous- When a triangle is said to be discrete, it means that it does not shares vertices with other triangles, whereas a contiguous triangle does. For example, a cube can be comprised of 12 discrete triangles for a total of 36 vertices. While this is a lot of vertices, it would allow modification of individual triangles. Alternatively, a cube could be comprised of 12 contiguous triangles for a total of only 8 vertices. This is certainly a reduction in vertices, but it means a single change will impact multiple triangles.
1. Flat Mesh

The first thing that was done on the level editor was to allow the creation of a flat mesh, which is comprised of discrete tiles. Please disregard the fact that there are four triangles per tile. At the time, I was considering having four contiguous triangles within each tile. However, I later decided for the sake of performance to use the standard approach of two contiguous triangles per tile to form a quad.
2. Colors
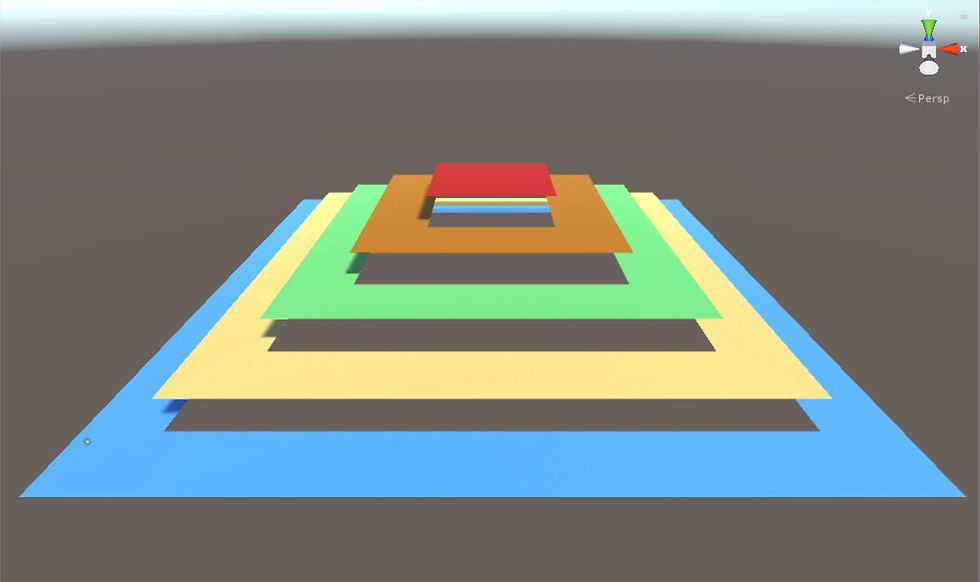
Next, I added functionality for coloring each quad. This only required that I associate a color with each vertex in the mesh.
3. Elevation
Changing the elevation of an individual tile was relatively easy because it only required modifying the y-value of that tile’s position, clearing the previous collections of vertices, triangles, and colors, and then recalculating the mesh. However, as seen in the above image, huge gaps were left in the mesh. Therefore, once a tile’s elevation had been

moved, a elevation comparison was made with each cardinal neighbor and quads were created to fill any gaps.
4. Slants & Corners
It is important that the level editor supports the creation of environments where AI agents are freely able to move between different elevation. Considering that not all agents will be capable of jumping, climbing, or flying, the decision was made to generate slanted shapes.

5. Unnecessary Triangles

If you look closely at the wireframe image, you can see that slanted pieces are still unnecessarily generating their side quads, but the majority of internal triangles and hidden triangles are not being generated. The removal of such triangles is certainly the most time consuming task because you have to consider all possible connection variations, but it is very important for a couple reasons:
First, less triangles means reduced memory consumption and fewer points of data that are iterated through when calculating meshes.
Second, a single mesh is limited to 65,535 vertices. If all those unnecessary triangles were to be kept, that limit would be reached very quickly. With each new mesh, at least one new draw call is incurred. One draw call might not seem like much, but it represents another agent that can be rendered without having issues with mobile device performance.
6. Texturing

Having the ability to modify a tile’s color is great for visualization, but it doesn’t create very appealing environments. To correct this, UVs were specified for all 9 shape variations, a texture atlas was created, and the user was given the ability to specify a different texture for the tops and sides of a tiles.
7. Texture Issues
While you may not have noticed it in the previous image, there were still serious issues with the texturing. To get a clearer idea of the exact issues, the tile textures were swapped out with a texture specifically made for UV mapping, which revealed skewing on the side triangles of slanted shapes.

After some minor corrections to the mesh triangle indices, the majority of issues of were solved, with the exception of texture stretching in quads. To solve this issue, long quads could be broken up into smaller quads. However, I held off on implementing that change because it had implications that couldn’t be fully considered with the remaining development time.
End Result
While the editor is certainly not finished, reasonable progress was made towards my goal. The goal I am working towards is having something that resembles the reference image for a well-received map editor available on the Unity Asset Store. Simply for the purpose of fun, I have included the comparison below.

Additional Information
If you want to learn more about mesh generation within Unity, I highly recommend the following sources of information:
Board to Bits- Great series of short videos that takes the viewer through the process of making a single triangle in Unity, all the way to generating multiple cubes and removing internal triangles.
Unity 2016- Video of a talk given on procedural mesh generation, which shows interesting applications, optimizations, and Unity specific concerns.
Catlike Coding- An entire series of blog style tutorials devoted to creating a hex map editor within Unity. In order to gain the most benefit from these tutorials, you should have a solid understanding of mesh generation, as well as have proficiency with C# and Unity.

Comments